Motorcycle Rider Lightbox Paper Cut Guide
There is a distinct satisfaction in transforming a flat sheet of paper into a scene that breathes with light and shadow. The Motorcycle Rider Lightbox Paper Cut represents more than just a craft project; it is a method of capturing the raw energy of the open road within a static frame. For designers, hobbyists, and small business owners looking to create impactful visual displays, this layered art form offers a perfect blend of technical precision and artistic expression. By stacking multiple layers of cut paper, you create a tangible sense of depth that flat printing simply cannot achieve, turning a simple silhouette into a dynamic narrative about freedom and movement.
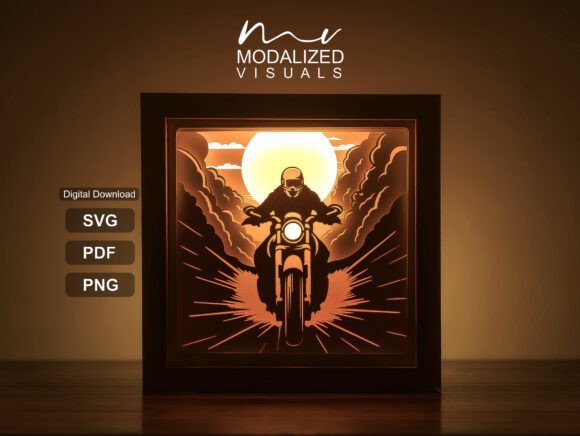
At its core, this design relies on the interplay between negative space and illumination. When you assemble a Motorcycle Rider Lightbox Paper Cut, you are essentially building a stage for light to perform. The foreground typically features the bold, detailed silhouette of the rider and the machine, while subsequent layers introduce environmental elements like speed lines, distant landscapes, or abstract geometric patterns. When backlit by an LED panel, these layers separate visually, creating a 3D effect that draws the viewer in. This technique is particularly effective for motorcycle enthusiasts because it mirrors the feeling of riding itself—the focus on the path ahead, the blur of the surroundings, and the singular connection between rider and machine.
Designing for Depth and Dimension
Creating a successful layered piece requires a shift in thinking from two-dimensional illustration to spatial architecture. You are not just drawing a picture; you are engineering a physical experience. To achieve the best results, start by defining your focal point. In a Motorcycle Rider Lightbox Paper Cut, the bike and rider must remain the undisputed stars. Ensure the primary layer has enough structural integrity to hold its shape while offering intricate details that catch the light. Bridges of paper—those thin connections that hold inner cuts in place—are critical here. They must be strategic so they do not distract from the silhouette but are strong enough to prevent sagging over time.
Consider the spacing between your layers. The distance between each sheet of paper dictates the intensity of the shadow and the perceived depth. For a dramatic, high-contrast look, keep the layers closer together. If you want a softer, more atmospheric feel where the background seems to drift away into the distance, increase the spacing. Many creators use foam core spacers or 3D adhesive dots to maintain consistent gaps. This consistency is vital for a professional finish. Irregular spacing can make the lighting look patchy rather than immersive. When planning your cuts, think about how the light will travel through the gaps. A well-designed piece allows light to graze the edges of the paper, highlighting the texture of the material itself.
Variations in Style and Application
The versatility of this medium means it can adapt to various aesthetic preferences and functional needs. While the classic approach involves a realistic depiction of a cruiser or sportbike against a sunset gradient, there is ample room for interpretation. Minimalist designers might opt for a monochromatic palette, using only black and white paper to emphasize form and shadow without the distraction of color. This approach works exceptionally well in modern offices or contemporary living spaces where clean lines are preferred.
Alternatively, you can embrace a graphic novel style. Use bold, thick lines and halftone patterns cut directly into the paper to mimic comic book shading. This resonates strongly with younger audiences and fits perfectly in gaming rooms or creative studios. For those interested in cultural specificities, consider adapting the background layers to reflect specific terrains—a winding mountain pass, a desert highway, or an urban cityscape at night. These contextual clues tell a story beyond just the vehicle, grounding the Motorcycle Rider Lightbox Paper Cut in a specific memory or aspiration.
Applications extend far beyond personal home decor. Small business owners, particularly those in the automotive or lifestyle sectors, can utilize these designs as unique signage. A lit display in a motorcycle shop window captures attention far better than a standard vinyl decal. It signals craftsmanship and attention to detail, qualities that customers often associate with high-end mechanical work. Event planners can also incorporate these lightboxes into themed parties or rallies, using them as centerpieces or photo backdrops that guests can interact with. The glowing nature of the artwork makes it ideal for evening events where ambient lighting is low.
Material Selection and Technical Execution
The quality of your final output depends heavily on your material choices. Not all paper reacts to light in the same way. For the front layers, a heavier cardstock (around 80lb to 100lb) is recommended to ensure crisp edges and durability. However, for the rear diffusion layers, you might experiment with vellum or translucent tracing paper. These materials soften the harshness of the LED source, creating a gentle glow that illuminates the scene without blowing out the details. If you are using colored LEDs, test how the hue interacts with your paper color. Warm white LEDs tend to enhance earth tones and leather textures often associated with motorcycles, while cool white lights accentuate chrome and metallic finishes.
Precision is non-negotiable. Whether you are cutting by hand with a scalpel or using a digital die-cutting machine, your cuts must be clean. Jagged edges become glaringly obvious when backlit. If you are producing these for sale or as gifts, consistency across multiple units is key. Create a master template and stick to it. Organize your workflow by cutting all layers of a specific type before moving to assembly. This assembly-line approach reduces errors and ensures that every Motorcycle Rider Lightbox Paper Cut meets the same high standard. Keep your workspace organized; losing a tiny bridge piece in a pile of scraps can ruin an entire layer.
- Light Source: Use edge-lit LED panels for even distribution, avoiding hot spots that can burn the paper or create uneven brightness.
- Framing: Choose deep shadow box frames (at least 1.5 inches deep) to accommodate the layers without compressing them.
- Mounting: Secure layers at the corners or along the very edges to keep the central design floating and unobstructed.
- Maintenance: Design the frame to be openable so dust can be cleaned from inside the box, preserving clarity over time.
Connecting with Your Audience
When sharing or selling your creations, focus on the emotion behind the object. People do not just buy a paper cut; they buy the feeling of the ride. Describe the process of layering as building a journey. For educators teaching this technique, emphasize the problem-solving aspect. Students learn about physics through light refraction, engineering through structural supports, and art through composition. It is a multidisciplinary project that yields immediate, rewarding results.
For marketers and content creators, this subject offers rich visual potential. Time-lapse videos of the assembly process perform exceptionally well on social media platforms. Showing the transition from a stack of plain paper to a glowing, three-dimensional masterpiece engages viewers and demonstrates value instantly. Highlight the customization options available. Can the rider's helmet color be changed? Can the background scenery be swapped? Offering these variations makes the product accessible to a wider range of buyers, from the Harley-Davidson purist to the Ducati enthusiast.
Ultimately, the Motorcycle Rider Lightbox Paper Cut is a testament to the power of simple materials used with complex intent. It bridges the gap between traditional papercraft and modern lighting design. Whether you are crafting a single piece for your garage or developing a line of products for a niche market, the principles remain the same: respect the light, honor the silhouette, and never underestimate the depth you can create with a simple sheet of paper. By focusing on clean execution and thoughtful design, you create not just an object, but an experience that celebrates the enduring spirit of the ride.