Vintage Vanity Case SVG: Crafting a Professional 3D Gift Box Without the Guesswork
There is a distinct difference between a handmade gift and a professionally crafted presentation. When you are preparing a present for a teacher, a new parent, or a close friend, the container often sets the tone before the recipient even sees what is inside. This is where the Vintage Vanity Case SVG shines. It is not merely a flat cardstock cutout; it is a sophisticated, three-dimensional structure that mimics the luxury of a high-end train case. However, moving from a digital file to a flawless physical object requires more than just hitting "print." Many crafters encounter avoidable pitfalls that compromise the structural integrity or aesthetic appeal of their final product.
Understanding the nuances of this design can save you time, materials, and frustration. Whether you are a seasoned entrepreneur selling at craft fairs or a beginner looking to impress, knowing what to watch out for ensures your 3D vanity case box looks expensive, not experimental.
Understanding the Design Potential
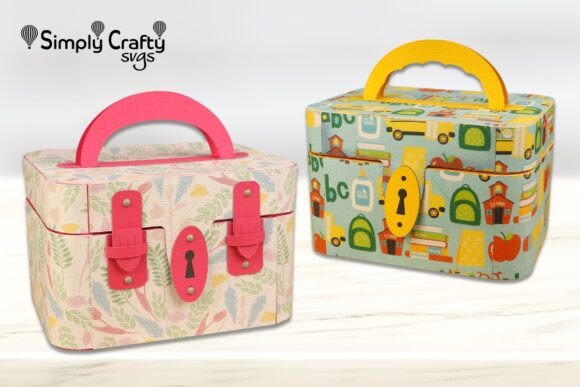
The appeal of the vintage vanity case lies in its versatility and structured silhouette. With rounded corners and a sturdy build, it serves as a high-end alternative to standard gift bags or flimsy boxes. The design typically includes two different handle versions and two unique front panel options, allowing you to toggle between a modern minimalist look and a detailed, classic aesthetic. This adaptability makes it suitable for various occasions:
- Baby Showers: Use soft pastels and the scalloped panel to create a charming "nursery kit" feel.
- Teacher Appreciation: Pair the case with school-themed patterns or a custom "Supplies Case" label for a thoughtful thank-you.
- Holidays: Utilize glitter or metallic cardstock to transform the case into a glamorous jewelry box.
The finished dimensions—5.6” x 4.2” x 3.5” tall—are perfectly proportioned for beauty products, small craft supplies, jewelry, or gourmet treats. However, achieving these precise proportions requires attention to detail during the preparation phase.
Common Mistakes and How to Avoid Them
Even with a step-by-step video tutorial included with many SVG packages, users often overlook critical details that affect the final outcome. Here are the most common errors and how to correct them.
1. Ignoring Cardstock Weight and Grain Direction
A frequent mistake is using standard printer paper or lightweight cardstock. A 3D vanity case requires structural rigidity to hold its shape, especially when filled with gifts. If the material is too thin, the box will bulge, the handles may tear, and the overall presentation will look cheap. Conversely, using overly thick chipboard without adjusting your machine settings can lead to incomplete cuts.
The Fix: Always use high-quality cardstock, ideally 65lb to 80lb weight. For the main case structure, three 12” x 12” sheets are typically required. Ensure you are cutting against the grain if possible, as this provides better bending resistance along the score lines. If you are using patterned paper for the panels, one 12” x 12” sheet is usually sufficient, but ensure it complements the base color without overwhelming the design.
2. Overlooking Score Line Precision
The elegance of the vintage vanity case comes from its crisp folds and rounded corners. Many beginners skip the scoring step or use a dull scoring tool, resulting in ragged edges and misaligned panels. This is particularly problematic for the rounded corners, which require smooth, consistent curves to maintain the "luxury" aesthetic.
The Fix: Do not rely solely on your cutting machine’s scoring wheel if it is worn. Consider using a bone folder after cutting to reinforce the score lines. Follow the included video tutorial closely, paying specific attention to how the side panels fold inward. A sharp, clean fold ensures the lid closes flush against the base, creating that professional, seamless look.
3. Misjudging Handle Attachment Points
The file includes two handle versions, but attaching them incorrectly is a common error. If the handles are glued too far inward or outward, the balance of the case is thrown off, making it awkward to carry. Furthermore, using weak adhesive can cause the handles to detach under the weight of the contents.
The Fix: Measure twice before gluing. Use strong tacky glue or double-sided tape specifically designed for heavy cardstock. Allow the adhesive to set completely before adding any weight to the case. If you are opting for the more decorative handle, ensure it is centered precisely to maintain symmetry.
4. Neglecting Interior Finishing
Because the vanity case opens like a traditional makeup train case, the interior is highly visible. Leaving raw cardboard edges or visible glue stains inside detracts from the high-end feel. Many crafters focus entirely on the exterior and neglect the inside, which is a missed opportunity for customization.
The Fix: Consider lining the interior with coordinating paper or fabric. This not only hides construction seams but also adds a layer of protection for delicate items like jewelry or glass bottles. You can use smaller scraps of paper for hardware details or interior pockets, maximizing your material usage.
Choosing the Right Materials for Your Theme
The versatility of the Vintage Vanity Case SVG allows for thematic adaptability, but your material choices must align with your intended use. For a baby shower, matte finishes in pastel tones work best to convey softness and care. For a holiday gift, metallic or glitter cardstocks add glamour, but be aware that these materials can be harder to fold cleanly. Pre-scoring glitter paper with a stylus before cutting can prevent cracking along the fold lines.
If you are creating these for a small business, consistency is key. Stick to a specific color palette and material type to ensure each unit looks uniform. Variations in cardstock thickness or color batches can make your products look inconsistent, which may affect customer satisfaction.
Final Checks Before Assembly
Before you begin gluing, lay out all your pieces. Verify that you have cut all necessary components from the three 12” x 12” sheets for the case and the single sheet for the panels. Check that the SVG files were scaled correctly to letter-size compatible dimensions if you are not using a 12” x 12” mat. A quick dry fit—assembling the box without adhesive—can reveal any alignment issues before they become permanent.
By avoiding these common pitfalls and focusing on precision, you can transform a simple digital file into a tangible piece of art. The 3D Vanity Case Box is more than just packaging; it is a statement of care and craftsmanship. With the right approach, you can create a gift presentation that rivals store-bought luxury, ensuring your recipient feels truly valued.